Layer Configuration
Your Pozi site’s map layers (aside from third party basemaps and imagery layers) are managed within QGIS projects.
Adding Layers
Using your existing QGIS project, you can add new layers to publish them to your users.
- open your project file in QGIS
- Layer > Add Layer > pick from vector, raster or other options
- navigate to source (see note about file paths below)
- Add
- Close
- Project > Save (
Ctrl+S)
Note
If QGIS displays a question mark next to the layer name, it may indicate that QGIS needs a projection to be specified. Go to Layer Properties > Source > Assigned CRS, and pick a projection. See here for more information.
About layer file paths
When adding new file-based layers, use the layer’s absolute file path (UNC) to ensure that the service under which the QGIS Server is running can recognise the path.
Typically your own user account will have certain drives mapped for convenience, so you might be used to working with data using file paths that refer to a drive letter (eg, G:\ or X:\). However, the domain user account that runs QGIS Server often won’t have these drives mapped.
A UNC path is an absolute path that is recognised by all user accounts, regardless of what drives are mapped on startup. An example UNC path might look like this \\servername\GIS\.
Add the UNC path of your GIS data folder as a Favorite in the QGIS Browser panel for easy access. Learn more here. Also add a shortcut to the UNC location on your PC desktop for extra convenience.
Some common layer configuration tasks you can do in QGIS include:
Publish as Vector Layer
Publishing a layer as a vector layer (WFS) enables users to directly interact with features. When a vector layer is turned on in Pozi, every feature from the source dataset is loaded in the browser, including all geometries and attributes. Users can make use of Pozi’s advanced functionality such as searching, filtering, downloading, table view and tooltips.
By default, QGIS Server does NOT expose layers as vectors.
When to Use
Evaluate the pros and cons of using vectors for your layer, and if appropriate, follow the directions below to enable it as a vector layer.
Advantages
- vector layers are fully interactive, enabling users to use the following functionality:
- search
- filter
- report
- table view
- download
- when a vector layer is turned on, Pozi loads the entire layer in the browser, including all geometries and attributes. The browser doesn’t need to send further requests to the server every time the user moves the map
- when hovering over a vector feature the cursor changes to indicate the feature is clickable, and a tooltip is displayed with the feature’s title
- vector layers can be used in link-ins
Disadvantages
- the browser can be easily overwhelmed when loading vector layers containing thousands of features, or complex features with many vertices, or tables with a large number of fields, resulting in slow map rendering
- not all QGIS styles are supported in Pozi for vector features
- text expressions for labels are not supported (but you can still make use of virtual fields for creating generating custom label values)
As a broad guideline, don’t enable vector layers for layers that take more than a few seconds to load unless the vector functionality for the layer is essential to your users, and they are happy to wait.
Layers with tens of thousands of features, or very complex features with thousands of nodes, or contain an excessive number of data fields, can often take a long time to load in the browser if enabled as vector layers.
Enable as Vector
- Project > Properties > QGIS Server > WFS/OAPIF
Published: tick on for each layer to be published as a vector layer (or you can clickPublish Allif all layers are required)- OK
- Project > Save (
Ctrl+S)

Layer Name
Warning
Pozi does not currently support duplicate layer names within a site.
If you have two layers that share a name, even if they are maintained in separate QGIS projects, alter the layer name (as described below) on one or both layers in the affected QGIS project(s) so that they are no longer the same.
Similarly, layer folder names must be unique, and must not share a name with any layer or layer folder within a site.
When you add a layer in QGIS, you can rename it from its original name to a more meaningful, user-friendly name within the QGIS project. Changing the name in QGIS does not affect the source table or file.
Go to Layer Properties > Source > Layer name
Spaces are allowed. To provide users with a better experience, it is recommended to replace any underscores with spaces and use spaces to separate words that may have been combined in the original name.
Reserved layer names
The following layer names cannot be used because they are reserved by the Pozi application:
Whats HerePozi AnnotationPozi HighlightPozi Current TargetPozi Measurement
All variations of these layer names (with or without spaces or capitalisation) are also reserved.
Styling
Instructions for styling your layers are available on the dedicated Layer Styling page.
Feature Title
When users select a feature from the map, Pozi prominently displays one of the feature’s attributes at the top of the Info Panel as the feature’s title.

The title should be the name of the feature or some other useful information to distinguish the feature from others in the same layer.
You can control which field is used for the layer’s title in QGIS.
Layer Properties > Display > Display Name

This Display Name field is also used fow showing tooltips for vector layers.
Please note that Pozi cannot use the display field if the field name has been given an alias. Consider creating a virtual field with the desired name and use that as the display field.
Selectability
#selectable #queryable #identifiable
To prevent the Info Panel from displaying results from specific layers (say, for imagery layers, or layers configured to display results as a child dataset), update the Data Sources settings in the QGIS project.
Project > Properties > Data Sources > Identifiable > untick to disable layer selectability

It can be useful to make a layer not selectable if it has a corresponding What’s Here dataset to avoid the Info Panel returning duplicate results.
Feature selection link-ins require the layer to be selectable.
Managing Data Fields
QGIS enables you to control what users see of the data without altering the source data.
Hide Fields
By default, all fields from the source data are exposed in Pozi’s info panel. These fields can provide users with a rich set of data to view, query and filter, and some fields are critical for Pozi to correctly display and style the layer (see below).
However if certain fields from the source data are not needed or contain sensitive information, you can prevent QGIS Server from exposing them to Pozi. This will prevent the fields appearing in Pozi’s info panel.
Layer Properties > Fields > select field > Configuration
- tick ‘Do not expose via WMS’
- tick ‘Do not expose via WFS’

Note that any fields required for any of the following purposes must remain exposed via WFS:
- id field for link-in
- id field for link-out
- id field for parent/child joins
- display/title field
- styling (relevant only for WFS layers):
- field used in categorised or rule-based styling
- label field
Specify Number of Fields to Initially Reveal
You can limit the number of fields that are initially revealed in Pozi’s info panel. Users can click the Show More button to reveal the remaining fields.

This functionality is designed to make efficient use of the Info Panel space to ensure that important information is not pushed off the bottom of the page. This is particularly relevant when dealing with layers that have related child datasets. By reducing the number of parent fields initially displayed, the user can see the child dataset details without needing to scroll down the page.
Configure the number of fields you want to initially reveal using the following keyword setting:
initialRevealFields=3
If you specify initialRevealFields=0, the Details pane will display in a collapsed state so that no fields are shown. Users will be able to click the pane header to reveal all fields.
Rename Fields
You can make field names more user-friendly by giving your field names an alias.
Layer Properties > Attributes Form > select field > Alias

Please note that Pozi cannot use aliased fields for a feature’s title or tooltip. If you intend to use a renamed field for the feature’s title or tooltip, consider using a virtual field instead of an alias.
Virtual Fields
You can control how your data appears to users without modifying your source data by using the Field Calculator function in QGIS to create virtual fields.
Some use cases for virtual fields include:
- generate a link for a web page or photo by combining a URL string and an ID value
- combine fields (eg first name plus last name, or street address plus locality)
- generate distinct values/classes from ranges to simplify styling or filtering (eg convert a date into a year value)
- perform calculations based on one or more existing values
- generate values based on the feature geometry (eg, length, area)
- do a find-and-replace within text values to change what is displayed to users
- duplicate an existing field, but use a different name (for example, for Pozi to support categorised styling, the target field name must not contain any spaces)
See the QGIS help guide for more information virtual fields and using the field calculator.
Create Link Field
This example shows how to generate a clickable link in Pozi by combining a URL string and an ID value from the data.
- Layer Properties > Fields > click Field Calculator button
- tick
Create virtual field - fill in
Output field namewith your new field name - in
Output field type, select Text (string) - build expression
Tips for building expressions:
- pick existing fields from the
Fields and Valueslist - use
||to combine strings - enclose static text with single quotes

The resulting virtual field appears in QGIS and Pozi as if it were standard field.

If the value in the field is a URL (as in this example), Pozi will display it as a clickable link, using the field name as the link text.

If the value is a string ending in .png or .jpg, Pozi will attempt to display the target image inline. Ensure that the string is a valid URL that is accessible by the user.
Imagery Layers
Local
You can add imagery layers such as aerial photos and satellite imagery from local TIF, ECW files, mosaics and other sources to your QGIS project.
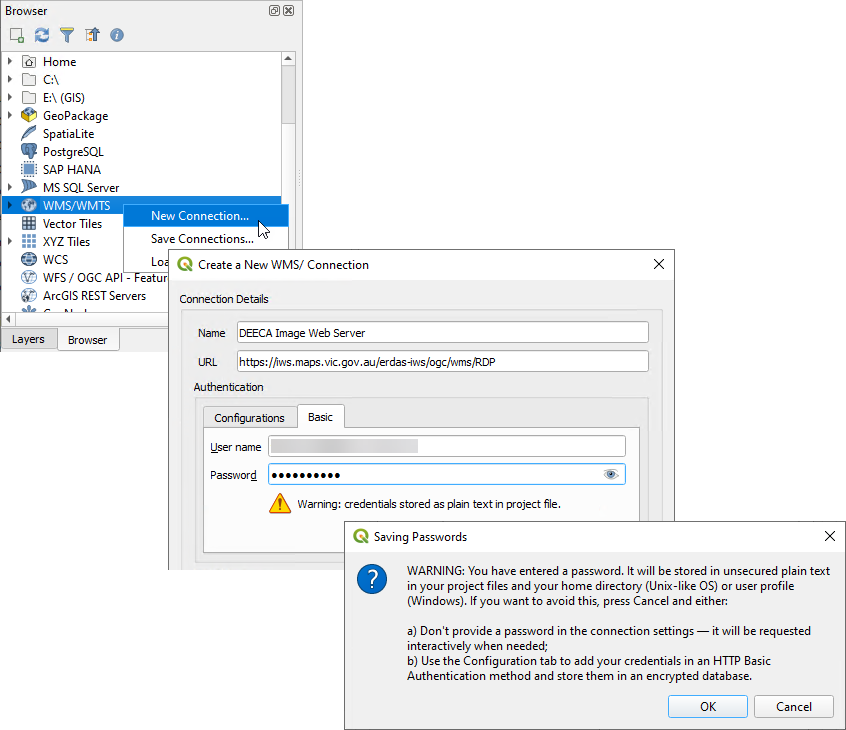
Remote
It’s also possible to add layers from an external WMS/WMTS. However keep in mind the following:
- the performance of these layers may be slower than normal due to all image requests being cascaded through the QGIS Server
- if the external WMS/WMTS service is password protected, the credentials must be stored in the QGIS project file - QGIS will prompt to warn that the credentials are stored in plain text, and you must accept that warning in order for QGIS Server to be able to access the service
Warning
If QGIS Server has any problem with the permissions on any of the layers in a QGIS project, it can prevent all the other layers in the project from loading.
Immediately after adding any password-protected layers, check Pozi to confirm that new and existing layers are working. If there are any issues, remove any problem layers from the QGIS project and resave it.
Exclude Layers
Your QGIS project may contain layers that are not needed for viewing in Pozi. For instance, your project may contain basemap layers that provide context for viewing map layers in QGIS, but you don’t want these to appear in the project’s layer group in Pozi.
To exclude any layers from appearing in Pozi:
Project > Properties > QGIS Server > WMS > Exclude layers (tick) > add > pick layers to exclude > OK

Optional Settings
Other settings can be configured using QGIS Server keyword list. Pozi obtains these settings when it loads and imports each project’s catalogue.
These settings provide an override for some of the default behaviours in Pozi.
Layer Properties > QGIS Server > Keyword list
| Setting | Description | Example |
|---|---|---|
enabled | set to false to disable a dataset in Pozi | enabled=false |
group | override which layer group the layer is listed under | group=Planning |
showInLayerControl | set to false to hide layer in the layer panel | showInLayerControl=false |
showLegend | set to false to hide legend | showLegend=false |
type | for WMS layers, set to TileWMS to render as image tiles (instead of a single image) | type=TileWMS |
visible | set to true to display layer by default | visible=true |
downloadable | set to false to hide download options for this layer in the layer options or table view | downloadable=false |
linkedLayers | use the current layer’s visibility to trigger the visibility of one or more other layers | linkedLayers=Playgrounds;Sporting Grounds |
infoPanelCollapse | set to true to collapse info results panel | infoPanelCollapse=true |
promoteDetails | set to true to display all attributes instead of a preview | promoteDetails=true |
initialRevealFields | limit the number of fields initially shown in the Details pane to the specified number | initialRevealFields=3 |
When using multiple keyword settings, use commas to separate them.
Example:
showLegend=false, visible=trueTable File Maintenance
If you need to move, rename or delete a source dataset from its file location or database, first remove the layer from any QGIS project to which the layer is registered, then save the QGIS project.
You may then attempt to make any changes to the table file(s). If Windows prevents you from making any changes, stop the IIS service that is locking the files.
IIS > (select server) > Application Pools > PoziQgisServer > Stop
You may also need to stop any other services that start with PoziQgisServer.
Restart the service(s) after you make your changes.