Under Construction
This page is a work in progress. Please refer to our existing Help Guide for information about this topic.
Pozi Server Installation
Prerequisites
- support account
- service account
- internet access (needed to communicate with connect.pozi.com for software updates)
Download and Install
- download the Pozi Connect Server installer
- install
- mkdir “C:\Program Files (x86)\Pozi\userdata\local”
- mklink /D “C:\Program Files (x86)\Pozi\userdata\local\sample” “C:\Program Files (x86)\Pozi\server\data\local\sample”
Enable permissions on userdata folder
The C:\Program Files (x86)\Pozi will be created by the installation process with limited permissions for editing. To enable your user account to make changes within the userdata folder, do the following:
- in Windows Explorer, navigate to
C:\Program Files (x86)\Pozi - right click
userdatafolder - Properties > Security > Edit > Add > Locations > select Entire Directory > OK
- type part of the user name of the support account, then click Check Names
- select your name and click OK, then click OK again
- tick Modify / Allow, then click OK
- click OK
Prepare userdata folder
- delete
sampleandvrtfolders - create
localfolder
The local folder corresponds to the subdomain that you have configured, eg, local.pozi.com. You can add other folders to correspond to any other subdomains you might want to use.
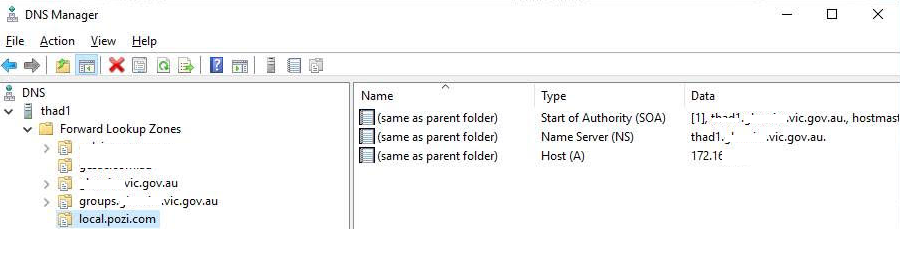
DNS Configuration
Configure the network Domain Name System (DNS) so that any requests to local.pozi.com resolve to the IP address of the server on which Pozi Server is installed.
SSL Certificates
Pozi Server communicates only on port 443, so all requests must be sent via https. The Pozi Server installation manages its own SSL certificate (*.pozi.com) to enable the local endpoint (eg local.pozi.com) to run securely.
If your organisation wants to use its own SSL certificate, place the certificate.cer and certificate.key files in the root Pozi folder, and restart the PoziConnectServer service.
Instead of configuring your DNS for local.pozi.com, you will use something like poziserver.[yourorganisation].com. Accordingly the subfolder you create inside the userdata folder (see Prepare Userdata Folder above) will need to correspond with the subdomain (eg, userdata\poziserver instead of userdata\local).
Note: due to a current limitation in Pozi Server, it will still expect any static files (images, style files, pre-rendered GeoJSON, etc) to be in userdata\local regardless of whatever subdomain is being used for domain forwarding.
Scheduled Restarts
As a Windows server, Pozi Server is designed to be always on. However sometimes Windows services can fail and cause the sync and other functions to become unresponsive.
To minimise any extended outages, configure a nightly scheduled task to force Pozi Server to restart to ensure it remains responsive.
The task requires Run with highest privileges to be able to restart services as that is usually restricted to Administrators.
The script will log exceptions to RestartPoziConnectServer.log if they occur.
Try {
  Restart-Service PoziConnectServer
} Catch {
  "[$(Get-Date)] [ERROR] $($_)" | Add-Content RestartPoziConnectServer.log
}
Testing New Versions
Install Test or Dev Release
Edit the C:\Program Files (x86)\Pozi\updater\updater-config.json file as follows:
Testing release
{
   "serverManifestFile": "manifest-server-testing.json"
}
Dev release
{
   "serverManifestFile": "manifest-server-dev.json"
}
Then stop and start the PoziConnectUpdater service. Monitor the updater.log file for progress.
Revert to Production Release
To rollback to a previous version (e.g., from v2.3.0-beta.3 on dev manifest to v2.2.0 on production manifest):
- revert the manifest file to the
productionversion by emptying the contents - stop the
PoziConnectServerservice - rename the
serverfolder - stop and start the
PoziConnectUpdaterservice
This will revert from the higher numbered dev manifest version to the lower numbered production manifest version.
Important note: any additional folders under the server folder that have been set up for “clean” URL configuration for QGIS Server will not appear in the new installation, which would be catastrophic for those sites that are using it. They must be copied from the renamed server folder.
Troubleshooting
If PoziConnectServer doesn’t appear in Windows Services, open PowerShell in Administrator mode, and enter the following:
cd "C:\Program Files (x86)\Pozi\updater"
.\nssm.exe install PoziConnectServer "C:\Program Files (x86)\Pozi\server\poziserver.exe"
Ping Test Failed
If you encounter a message that says “The ping test to connect.pozi.com failed”, ensure that your machine has permissions to connect to connect.pozi.com.